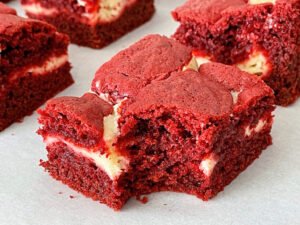
Red velvet meets creamy cheesecake in these irresistible layered brownies! This decadent dessert combines a rich, fudgy red velvet base with a luscious cheesecake filling that’s both visually stunning and delicious. Perfect for Valentine’s Day, holidays, or whenever you want to impress guests with a unique and indulgent treat.
Ingredients
For the Red Velvet Brownie Layer:
-
¾ cup unsalted butter (melted)
-
1 cup granulated sugar
-
2 large eggs
-
1 tsp vanilla extract
-
1 tbsp red food coloring
-
1 tbsp unsweetened cocoa powder
-
¾ cup all-purpose flour
-
¼ tsp salt
For the Cheesecake Layer:
-
8 oz (226g) cream cheese, softened
-
¼ cup granulated sugar
-
1 egg
-
½ tsp vanilla extract
Instructions
Step 1: Prepare the Brownie Batter
-
Preheat oven to 350°F (175°C). Line an 8×8-inch baking pan with parchment paper.
-
In a large bowl, whisk together melted butter and sugar until smooth.
-
Add eggs, vanilla extract, and red food coloring. Mix well.
-
Sift in cocoa powder, flour, and salt. Fold until fully combined. Reserve ¼ cup of batter for swirling on top.
Step 2: Prepare the Cheesecake Filling
-
In another bowl, beat cream cheese until smooth.
-
Add sugar, egg, and vanilla. Beat until creamy and lump-free.
Step 3: Assemble
-
Pour red velvet brownie batter into the pan and smooth it out.
-
Gently pour the cheesecake mixture on top.
-
Dollop the reserved brownie batter over the cheesecake layer and swirl with a knife.
Step 4: Bake
-
Bake for 30–35 minutes, or until the center is set.
-
Cool completely, then chill for 1–2 hours before cutting for clean layers.
Tips for Perfect Brownies
-
Let brownies cool fully before cutting to keep layers neat.
-
Use a hot knife (wiped clean between slices) for perfect squares.
-
Want extra chocolate? Add chocolate chips to the brownie layer!
To better follow the process and master the swirl technique, watch the step-by-step video on our website. Seeing the textures and layers come together visually makes it easier and more fun to bake!