
🍒 Refreshing Cherry & White Chocolate Summer Cake
When warm days knock at your door and your appetite craves something cool, light, and easy to make, this creamy summer dessert delivers just that.
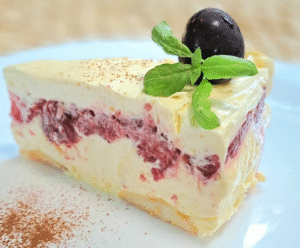
Meet the Cherry & White Chocolate Layered Cake—a delightful no-bake treat that combines a luscious hazelnut cream with a tart cherry layer, all nestled atop soft ladyfingers. It’s the perfect balance of creamy, fruity, and refreshing!
Whether you’re serving it at a birthday party, summer lunch, or simply as a sweet ending to your day, this cake is guaranteed to become a favorite in your recipe collection.
💫 Why You’ll Love This Cake
-
No baking required
-
Light yet indulgent
-
Can be made ahead of time
-
Gorgeous for serving guests
🍰 Cake Layers Breakdown
This dessert features several thoughtfully crafted layers, each bringing something special to the overall flavor and texture:
-
Creamy hazelnut and white chocolate filling
-
Fruity cherry layer with raspberry pudding
-
Ladyfinger base soaked in milk
Together, these elements create a light, silky texture with a refreshing finish that’s perfect for summer.
🛒 Ingredients
For the Cream Filling:
-
4 egg yolks
-
4 tbsp sugar
-
2 packets vanilla sugar
-
150 g white chocolate, chopped
-
150 g margarine or unsalted butter, softened
-
150 g ground hazelnuts
-
200 g whipped topping powder (prepared per package instructions)
-
1 pack of baby ladyfingers
-
130 ml milk (for dipping the ladyfingers)
For the Cherry Layer:
-
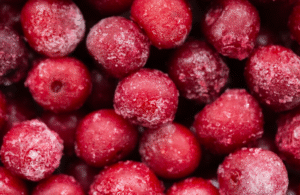
300 g cherries (fresh or frozen)
-
1 raspberry-flavored pudding mix
-
150 g sugar
👩🍳 Step-by-Step Instructions
🍫 1. Prepare the Cream Layer
This rich, white chocolate custard filling brings a silky, nutty depth to the cake.
Instructions:
-
In a heatproof bowl, whisk together the egg yolks, sugar, and vanilla sugar until fluffy.
-
Place the bowl over simmering water (double boiler) and cook for 8–10 minutes, stirring constantly.
-
Add the chopped white chocolate while still hot and stir until melted.
-
Let the mixture cool to room temperature.
-
In a separate bowl, beat the margarine or butter until creamy, then fold into the cooled custard.
-
Prepare whipped topping as per the package instructions (usually with cold water or milk), and gently fold it into the cream using a spatula.
-
Stir in the ground hazelnuts for extra texture and flavor.
👉 Tip: Divide the finished cream into two equal portions—you’ll use them for layering.
🍒 2. Prepare the Cherry Layer
This vibrant layer adds a tart, fruity contrast to the rich cream.
Instructions:
-
In a saucepan, add just enough water to cover the bottom.
-
Add the cherries and sugar, and cook for a few minutes until the cherries release their juices.
-
In a small bowl, whisk the pudding mix with a little water until smooth.
-
Pour the pudding mixture into the cherries, stirring constantly.
-
Cook until thickened to a jam-like consistency, then let it cool slightly before layering.
🧁 3. Assemble the Cake
Use a round springform pan or a square dish if you prefer neat, sliceable portions.
Assembly:
-
Dip each ladyfinger briefly into the milk and arrange them at the bottom of your pan to form a base.
-
Spread the first half of the cream evenly over the ladyfingers.
-
Top with the cherry layer, spreading it all the way to the edges.
-
Add the second half of the cream, smoothing out the top.
-
Decorate as desired—with whipped topping, grated white chocolate, cherries, hazelnut flakes, or all of the above!
Note: Ladyfingers are only used as the base layer—no layering in between!
❄️ 4. Chill & Serve
This cake needs time to set so the layers can firm up and flavors can blend beautifully.
Chilling Tips:
-
Refrigerate for at least 4 hours, or even better, overnight.
-
Use a sharp knife dipped in hot water for clean, beautiful slices when serving.