Are you looking for a sourdough rolls recipe to put your resting sourdough starter to some use? You have reached the right place.
These tasty sourdough rolls are baked only with a sourdough starter. And let me tell you that these soft and buttery dinner rolls are super easy to make. They have a tender and delicious crumb with a hint of sweetness from the milk, sugar, and milk powder, but also have a breeze of sourness from the sourdough.
Why should you try making these sourdough rolls?
- They are no yeast sourdough rolls that have a unique flavor due to the sourdough starter.
- This is a quick same-day recipe.
- It can be easily made into an overnight sourdough rolls recipe(read the recipe notes
- This is an eggless recipe that can be easily adapted to a vegan recipe.
Ingredients for making soft and delicious sourdough dinner rolls

These sourdough rolls are egg-free and made with very few ingredients. This recipe is also easy to adapt into a vegan sourdough roll. For more keep reading…
Sourdough starter
These sourdough rolls are gonna be hundred percent leavened with a sourdough starter. I have not used any commercial yeast in the recipe. As we are not going to use any active dry yeast or instant dry yeast, we need to make sure that our sourdough starter is potent enough to handle the leavening on its own. It’s no biggie for our vigorous mature starter. Righ!
We just need to make sure that the starter is ripe and bubbly. The starter should be at its peak when we use it in the recipe. It is important to align the baking schedule with the peak of the sourdough starter. After the sourdough starter has reached its peak, it starts to fall. The yeast is hungry, there is no food left for yeast in the starter now.
What if we miss the peak?
The top of the sourdough starter becomes concave instead of convex. The yeast population in the starer gets reduced. Now, if we use such a hungry starter for our recipe, it will take much longer for the yeast to start multiplying again. As it has entered the lag phase. So, just forget about the quick sourdough rolls. The bulk fermentation and overall baking schedule will stretch. That is why I always stress using ripe sourdough starters at the right stage of growth.
Flour
I have used all-purpose flour for making this sourdough rolls recipe. You can use bread flour to get better texture and result. Bump up the hydration by 3-4 percent as bread flour has higher protein content and can absorb more water than all-purpose flour.
Milk
Use room temperature milk for the recipe. For getting the best results select whole milk only. Milk acts as a tenderizer and fat is the key tenderizer here. So, using skim milk will not make soft sourdough rolls.

Butter
Butter is another ingredient that not just makes these sourdough soft rolls tender, but also gives a buttery flavor to them. You can replace butter with any neutral fat of your choice. If you want to make this recipe dairy-free, use margarine or oil instead of butter.
Salt and sugar
Salt and sugar are added for the flavor and sugar also provide instant food for the yeast in the sourdough, which helps in kicking in the initial fermentation activity.
Milk powder
Dry milk powder is an optional ingredient, but I just love the flavor that it gives to the bread. It also helps with the keeping quality of the rolls. Please note that we are not using any eggs on this website, so milk powder is my way of substituting eggs in enriched doughs like these.
Are sourdough rolls vegan? If not, how to make ones?
Well, the sourdough rolls are not conventionally vegan. But you can easily make them vegan. Just substitute butter and milk with vegan alternatives. Instead of butter, I would suggest using some vegan butter, margarine, or vegetable oil. Substitute milk with equal soy milk. You can omit dry milk powder. This recipe is very easy to adapt into a vegan rolls recipe.
How to make quick sourdough rolls?: Instructions
Step 1: Kneading the dough
These pull-apart no yeast sourdough rolls are super easy to make. If you have a trustworthy stand mixer, you do not need to worry about a thing. Start by measuring all the ingredients using a scale for consistent results every time.
Make sure that milk is at room temperature and butter is softened. I like to take them out of the fridge about half an hour ahead of baking. Also, ensure that the sourdough starter is at its peak activity.
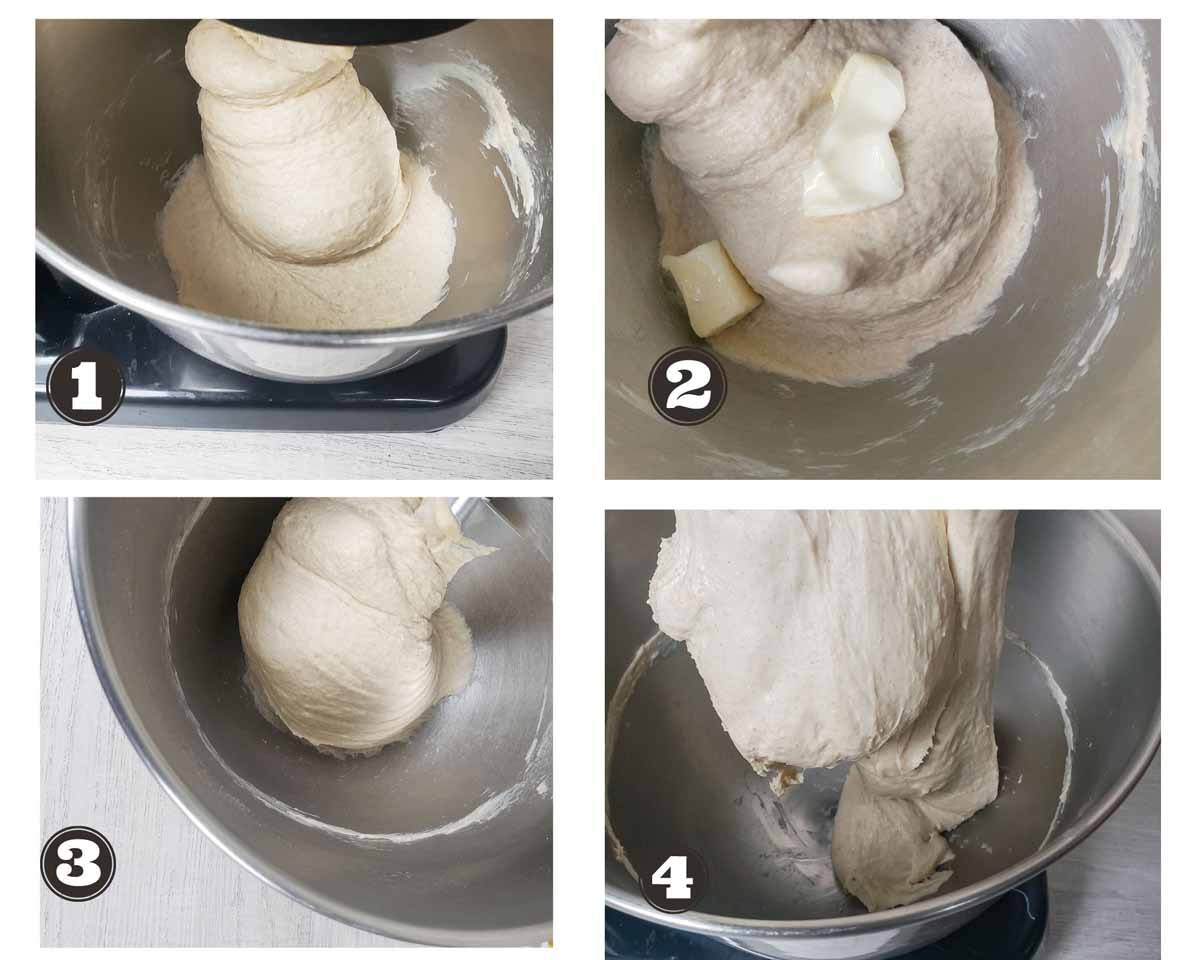
Now add the sourdough starter and milk. Start to knead using the dough hook attachment. Knead the dough at low speed or 1-2 speed for 12-15 minutes.
Rather than sticking to the time frame, it is better to understand the dough. Every stand mixer is different, the exact timeframe will be different for all. I suggest you knead until:
- The dough should become smooth.
- It no longer sticks to the sides of the bowl.
- The dough should have almost left the bottom of the bowl of the stand mixer.
- On touching with the finger, it should not stick to the finger.
- The dough looks shiny and supple.
That is how you know that the dough is ready to add butter. It is better to add butter in two stages.
First, add the half and knead for 5-7 minutes or until the butter is fully incorporated. Then add the remaining butter and knead till fully combined into the dough. When the dough is ready, grease a large bowl and transfer the dough to it.
Kneading with hands:
If you are going to knead the dough with your hands. Follow the same sequence of adding the ingredients.
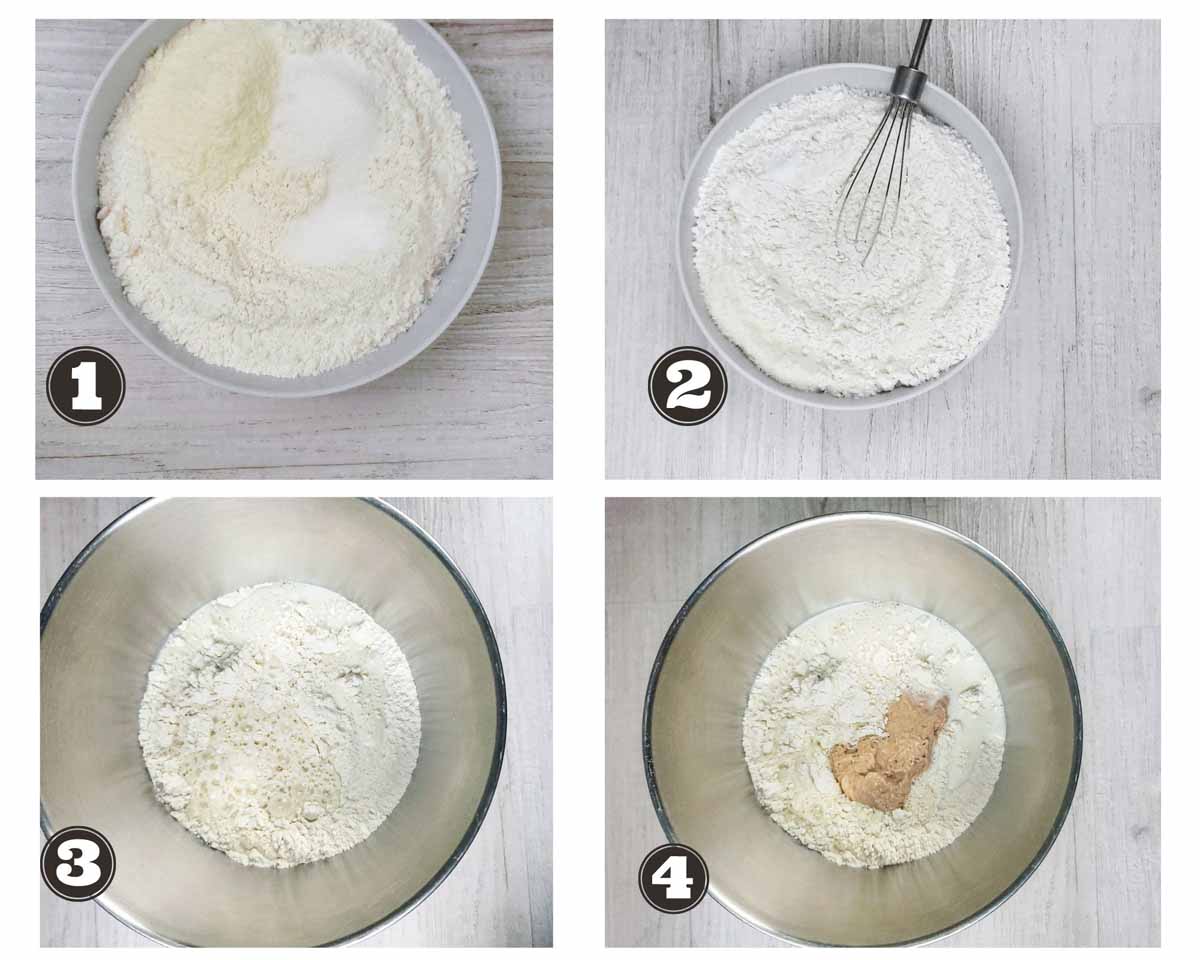
First, combine all the dry ingredients and then add milk and starter. Mix everything using the back of a ladle. You have to make sure to combine them well and leave no dry patches of flour. Cover the dough mass and let it rest for 15 minutes.
Step 2: Bulk fermentation

Now, transfer the dough to a greased bowl with enough headroom for the dough to rise. We must cover it with a kitchen towel or a cling wrap to prevent the dough from getting dry from outside. Also, it is crucial to place it in a warm corner of the kitchen if it’s colder than 75 0 F. The optimum temperature for bulk fermentation is 80-90 0F. You can use a proofing box if you have one. Or use the instant pot in yogurt mode for the purpose.
If you don’t have any of these, just put the dough to bulk ferment in the oven with the light turned on. If it is really cold where you live, put a pan with boiling water on the lower shelf of the oven while the dough bulk ferment in the oven.
Let the dough bulk ferment for 5-6 hours or until it appears to have doubled in volume. It may take more or less time depending on the dynamic specific to your starter, and the temperature, and RH of your kitchen. So, I advise you not to go by the timeframes given in the recipe. They are just loose guidelines. Judge for yourself.
Step 3:Shape the sourdough rolls

When the dough has doubled up in volume, remove it to a flour-dusted work surface and shape it into a round ball. It is time to shape the dough into individual dough rolls to make the sourdough rolls. To do so, first, measure the dough and then calculate the weight for each roll. Or you can simply eyeball the rolls.
Since we used the former method, the total weight of the dough was 822grams and I decided to make 9 sourdough dinner rolls, so, each roll should weigh around 91 grams.
Weight of each roll=Total dough weight/number of rolls you wish to make
=822/9
=91.3g
If you want to make smaller rolls or mini sourdough rolls, you can divide the dough into 12 rolls using the same method and formula.
To shape each roll, flatten the dough piece and then gather the edges to the center. Flip it such that the seam faced the surface and the smooth top faces you. Now use the sides of your palms to lift, twist, and drop it back. Repeat till smooth topped round rolls are formed. Shape the rest in the same manner.
Now, we prepare a 9 inch round pan and place the rolls about half an inch apart. Since, we are going to make the pull-apart sourdough rolls, place them closer. Also, I am using a deeper pan, it has enough room to accommodate the rising dough. If you have a shallow round pan, choose one with a wide diameter or a wider square or rectangular pan.
You can make them into individual rolls or buns also. Just place them in a baking tray spaced about 2 inches apart.
Step 4: Second rise

After putting the rolls in the baking pan, take a piece of cling wrap and brush it with oil. Now use it to cover the proofing rolls, with the greased side towards the rolls. This will prevent the dough from sticking to the cling wrap if it comes in contact.
It should take about 2 and a half to three hours for the second rise. The rolls should double up in volume and the dough will become very light.
Overnight proofing: How to make overnight sourdough rolls
If you do not have time to bake them or for some reason want to bake them the next day. You can proof them overnight in the fridge also. For achieving overnight proofing, first, let them proof at room temperature for about an hour and then, cover properly and place in the fridge for proofing overnight.
Next morning, take them out of the fridge, about an hour before you plan to bake them. Let them come to room temperature and rise at room temperature to become fuller. Sometimes the proofing gets highly retarded in the fridge. In such cases be prepared to give them ample time at room temperature to rise before putting in the oven for baking.
Please note that never put the under-proofed rolls for baking. All they need is more time. Over-proofed sourdough dinner rolls are much better than under-proofed ones.
Step 5: Bake and serve
When the rolls are ready, preheat the oven to 385 0 F. Place an old pan on the lower shelf. After the oven has reached the desired temperate, place the sourdough rolls for baking in the middle rack. Pour half a glass of water into the heated pan that we placed on the lower rack to induce steam in the oven. Quickly close the oven door and let the rolls bake for 40 minutes.
Midway through, take them out to give a milk wash. You can sprinkle some sesame seeds if you like. Honey helps with sticking the seeds to the surface of the rolls. But if you are not going to add any seeds on the top, just give a plain milk wash to the rolls. Rotate the pan in between for an even golden brown color on all the rolls.
When baked, let the rolls cool for at least 15 minutes before removing them from the pan. Then let them cool for another 10 minutes on a cooling rack before serving with your favorite stew.
Share and enjoy.!