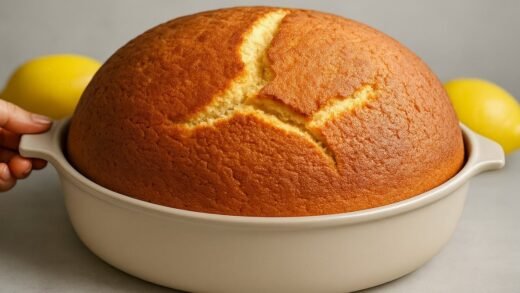
This Cream Cheese Pound Cake is a simple, delicious, and moist pound cake recipe that results in a perfectly crispy outer crust.
Whenever I think of pound cake, I think of a sweet lady named Linda Hughes. Mrs. Hughes was one of my teachers when I was in 6th grade, and few people have had a more profound effect on my life. She helped me through some tough times in my life, specifically in junior high and high school. She also quickly became a family friend. One thing we shared in common was the love of good food.
She was known for her signature pound cake. I remember one specific time where my dad helped to fix her car and she came to pick it up with one of her pound cakes in tow. You can read more about this sweet lady right below the recipe.

Now, this recipe isn’t hers, but if you want her classic pound cake recipe, you’ll find it in my cookbook. She was so kind to allow me to include it there.
No, this recipe isn’t hers, but is a family recipe my mom has used for decades. If you are looking for a homemade pound cake recipe that won’t have you tearing down the whole kitchen, this is the perfect, easy cream cheese pound cake recipe for you. It’s perfectly moist and dense in the center while still having that beloved crispy outer crust. You can serve it just as is or topped with fresh berries and a dollop of whipped cream. Either way, it’s simple but oh-so delicious! Enjoy!
Tips for the Perfect Pound Cake
- Make sure your ingredients are at room temperature, especially the cream cheese, butter, and eggs. This allows the cake ingredients to emulsify together resulting in the best texture.
- Make sure to measure your flour correctly. The method I recommend is to spoon the flour into a dry measuring cup and then use the back of a butter knife to level off the flour in the cup.
- Cream the cream cheese, butter, and sugar together very well. In this recipe, you start with creaming together the butter and the cream cheese. Then, you add in the sugar. Take your time on these two parts! The process typically takes about 5 minutes for each step. Yes, five whole minutes each step, so 10 minutes total. Trust me, it’s worth it in the end!
- Don’t over mix after adding the eggs. Once the eggs go into the batter, you want to mix just enough to get everything combined, but not too much. This is very unlike when you cream together the cream cheese, butter, and sugar. Minimal mixing here! Whipping too much air into the batter at this point can cause the cake to overflow and eventually fall.
- Don’t forget to grease and flour it well. I typically use a paper towel to smear vegetable shortening on the entire pan surface of a Bundt pan, dust the pan in all-purpose flour, and shake the excess flour out. Many have had success using homemade cake release. To do this, simply mix equal parts of all-purpose flour, vegetable shortening, and vegetable oil together until smooth. Then, use a pastry brush to coat the pan before adding the batter. Extra release can be stored in the fridge in an airtight container for several months.
- Be sure to pick the right pan! We tested many different Bundt cake pans but determined that the newer cake pans did the best with releasing the cake over our antique pans. I love this one.
- Make sure the cake is done. The cook time will vary based on the specific oven, pan type, etc. The cake should be golden brown and a toothpick inserted in the center should come out clean. A few moist crumbs are ok. I also typically check the temp of my cakes using an instant read thermometer. I shoot for between 208°F and 210°F.

How to Quickly Soften Cream Cheese
I’ve mentioned above the importance of bringing cream cheese to room temperature before creaming it together with the butter. It is important to soften your cream cheese so everything blends together easily. There are several ways you can soften cream cheese quickly. You can choose any of the following methods:
- Submerge in a large mixing bowl of warm water for about 10 minutes.
- Microwave the cream cheese in 15-second intervals.
- Leave out your cream cheese on the counter at room temperature for 30 minutes to an hour. This is my preferred method.
- Place in your hands while still in the packaging for about 15 minutes. Press the packaging back and forth in your palms until you can feel it is creamy and approximately room temperature.
What can I do if my pound cake sticks to the pan?
Oh no, a sticky pound cake can be a real bummer, but don’t worry! Here’s a quick guide to help you rescue that delicious treat:
- Give it time to cool: Sometimes, cakes need a bit of time to settle before they come out easily. Let it cool for about 15-20 minutes. If it’s still stuck, move to the next steps.
- Loosen the edges: Take a thin, flexible knife or a spatula and gently run it around the edges of the cake. This helps to separate the cake from the sides of the pan.
- Tap and shake: Place a plate or a wire rack over the top of the pan, then flip it upside down. Gently tap the bottom and sides of the pan. Sometimes, a little shaking can help the cake release.
- Use steam power: Place a damp kitchen towel over the top of the upside-down pan. The steam can help loosen the cake. Leave it for about 10-15 minutes before trying to remove the cake again.
- Try a warm water bath: Fill your sink with a couple of inches of hot water and sit the bottom of the cake pan in it for a few minutes. This can help loosen any parts that are sticking due to sugar.
- Freeze it: If all else fails, pop the cake (pan and all) into the freezer for about 30 minutes. The cold can sometimes help it contract slightly and come out more easily.
If nothing works, count your losses and turn the pieces into a trifle and punch bowl cake!
Why did my pound cake turn out like this?
Dense Cake: Could be due to overmixing, not enough leavening, or incorrect measuring of ingredients.
Dry Cake: Might be caused by overbaking or too much flour.
Sinking in the Middle: Often due to the cake being underbaked, too much leavening, or the oven temperature being too high.
Tips for Storing, Freezing, and Thawing Pound Cake
Storing Pound Cake
1. Cool Completely: Make sure the pound cake is completely cooled before wrapping and storing. Storing a warm cake can cause condensation, which leads to a soggy texture.
2. Wrapping: Wrap the pound cake tightly in plastic wrap. This helps to keep the moisture in and prevents the cake from drying out. For an extra layer of protection, you can wrap it in aluminum foil over the plastic wrap.
3. Airtight Container: Place the wrapped pound cake in an airtight container or a resealable plastic bag. This helps protect it from air and other odors in the fridge or pantry.
4. Room Temperature: If you plan to eat the pound cake within a few days, storing it at room temperature is fine. Keep it in a cool, dry place away from direct sunlight.
5. Refrigeration: If you need to store the cake for a longer period (up to a week), place the wrapped cake in the refrigerator. Refrigeration can sometimes dry out cakes, so make sure it’s well-wrapped.
Freezing Pound Cake
1. Prepping for Freezing: For best results, freeze pound cake when it’s as fresh as possible. You can freeze the whole cake or slice it into individual portions for easier thawing.
2. Double Wrapping: Wrap the pound cake tightly in plastic wrap, then wrap it again in aluminum foil. This double layer of protection helps prevent freezer burn and maintains the cake’s moisture and flavor.
3. Label and Date: Don’t forget to label your wrapped pound cake with the date it was frozen. This helps you keep track of how long it’s been in the freezer.
4. Freezing Slices: If you’re freezing individual slices, wrap each slice in plastic wrap, then place all the wrapped slices in a single layer inside a resealable freezer bag. This way, you can easily grab a slice or two whenever you want.
5. Freezer Storage: Store the pound cake in the coldest part of the freezer, not in the door. The back of the freezer maintains a more consistent temperature, which is better for long-term storage.
Thawing Pound Cake
1. Room Temperature: To thaw the cake, remove it from the freezer and let it sit at room temperature, still wrapped, for several hours or overnight. Keeping it wrapped while thawing helps retain moisture.
2. Quick Thaw: If you’re in a hurry, you can thaw slices in the microwave. Unwrap the slices and place them on a microwave-safe plate. Use the defrost setting for short intervals until the cake is soft.
3. Refreshing the Cake: For an extra touch, once thawed, you can warm slices in the oven at 300°F for about 10 minutes. This gives the pound cake a freshly baked feel.
Recipe Card
Crusty Cream Cheese Pound Cake
Ingredients
- 1 (8-ounce) package cream cheese (room temperature)
- 1 1/2 cups unsalted butter (room temperature)
- 3 cups sugar
- 1 teaspoon vanilla flavoring
- 1 teaspoon almond flavoring
- 6 eggs
- 1/2 teaspoon salt
- 3 cups all purpose flour
Instructions
Preheat the oven to 300°F. Grease and flour a (10 to 12-cup) bundt pan.
Use a mixer to cream the cream cheese, butter, and sugar together for 5 minutes.
Add vanilla and almond flavorings; mix well. Add one egg at a time, mixing after each one until it is just incorporated. Don’t over mix.
Whisk the salt into the flour in another bowl, then gradually add the dry ingredients. Mix on medium speed until just combined. Scrape down the sides of the bowl and mix again, being cautious not to over mix.
Pour into the prepared pan and bake for 1 hour and 25 minutes to 1 hour and 35 minutes, or until a toothpick inserted in the center comes out clean.
Cool for 15 minutes in pan, then invert over serving dish and turn out.
Nutrition
* If nutritional values are provided, they are an estimate and will vary depending on the brands used. The values do not include optional ingredients or when ingredients are added to taste. If calorie count and other nutritional values are important to you, I recommend grabbing your favorite brands and plugging those ingredients into an online nutritional calculator.